Marco Pollo Crew Cabin
Original Post: 27 January 2015
Posted Here: 28 November 2017
Most books on writing fiction mention the importance of knowing everything that you can about your characters and their environment. Not all of that information makes its way into your story or novel, but it helps you to know how your characters will react in any circumstances, and what will bring about those circumstances.
This information may seem of little importance if you write flash fiction, but the longer your story, the more important the information is. If you write a novel, this information can be very important. If you write short stories or novels set in the same "universe" (as I do), then the information can be even more important. Bidido wears an eye patch. Now I need to mention which eye it covers. Is it the
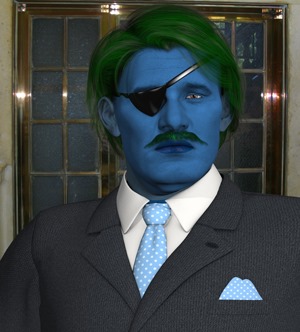
left or the right? Was it mentioned earlier in the story or in a previous story? I don't want to say it's over the right eye on page 5 of my first novel and over the left on page 280 of my second.
How this information is recorded and made available varies from writer to writer. My stellareco.com web site is my way of doing this for myself. It also lets my readers in on this same info. My interest in the 3D graphics program, Poser, is part of my desire to know my characters and their environments. Now I can know what Tom, Tahiti, or Trittcha look like (and which eye Bidido's patch covers.)
As I was writing my novel, "Silver Threads," I found that I needed to know where the bathroom (the "head") was relative to the bridge of the Marco Pollo starship. Elsewhere, I need to know that the bridge was too small to be used by the saurians of the planet New Home. So I got out a sheet of graph paper and drew a scale model of the Crew Cabin of the Marco Pollo. The bridge at the "north" end was connected to a lounge at the "south" end by a hall. Along the hall was, first, the head and the galley, followed by the two crew quarters. The overall dimensions of the Crew Cabin was 19 feet wide by 34 feet long. If needed, extra passenger quarters could be constructed beyond the lounge in a multipurpose/cargo area whose size is not defined.
Now, when I write about events on the Marco Pollo, I know where everything is and I can be consistent from chapter to chapter or from one short story to another. To provide an even better view of the rooms and furnishings of the Crew Cabin, I fired up my Poser Pro 2014.
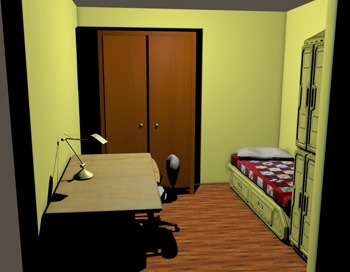
I used Poser primitives to create the walls, floor, ceiling and doors. I populated the rooms with lights and props appropriate to each. For example, the head has a shower and bathtub, a commode and toilet paper dispenser, a vanity cabinet with sink, and a tile floor. In the Captain's Quarters, I put a quilt that Janet made onto Tom's bed.
Eventually, I had a Poser file of the Crew Cabin (all 7 rooms) and its contents that I could look at or utilize if I wanted to create an image onboard the Marco Pollo.
Unfortunately, Poser has to consider all the "stuff" in the file even if only a single room is to be in the final render. This makes operations like moving the camera very slow.
I decided to create seven separate Poser files--one for each room. I deleted everything but the desired room, its lights, and its contents and saved the result as a separate file. Now all I had to do was to load CrewQuarters1.PZ3 if I wanted a scene in the Captain's Quarters.
If necessary, I could make walls and doors invisible to get good views of the interior of a room. Unfortunately, if I wanted a shot from behind someone standing in a doorway looking into the Captain's Quarters (or from the inside looking out), then the hallway around the character was missing. I could have the hallway in the scene, or the room, but not both unless I used my large Crew Cabin file. I'm not aware of a way to combine two different Poser files into one. What I needed were Library files for each room that could be loaded just like characters and props.
Here's what I did:
First, I loaded the file of the room that I wanted to work with.
Next, I added a Poser Pro Left Hand Figure (any figure would do) to the scene to be my "Main Parent". I posed the hand under the floor, out of sight. I changed the name from "Left Hand" to the name of the room. For instance, "Left Hand" >>> "Galley". Then I "parented" every other figure in the room to the Main Parent (Galley) via the Figure drop-down menu and every prop in the scene to the Main Parent via the Object drop-down menu. I checked that I hadn't missed anything by selecting the Main Parent and increasing or decreasing the scale. If everything rescaled, then I'd parented everything correctly. Now if I need to move the room to make the doorway fit the hall's doorway, I select the Main Parent and change its x, y, and z coordinates. Other items in the scene can be selected and moved within the scene as desired.
Once everything had been correctly parented, I created a folder in the Library (in this case, Figures\Spacecraft\Marco Pollo Crew Cabin) with the Create New Folder button at the bottom of the Library window.
Next, I made sure that this folder and the Main Parent-Body were selected. Then I clicked the Add to Library button at the bottom of the Library window. I named the room (Galley, etc.) and clicked OK, then clicked select the Whole Group (if asked). The scene was saved, ready to use, into the Library.
Now maybe I can make some scenes to represent life on the Marco Pollo.
Keep reading/keep writing - Jack